"Six Feet"

Six feet.

I’ve said it. You’ve said it. Fauci has said it. But why are we saying it?

Doesn’t that seem a bit… I don’t know, arbitrary? Random? Other synonyms?

Did you know that the World Health Organization actually recommends one meter?

Can’t germs travel seven feet? Or ten? What about the butterfly effect – if a butterfly sneezes in Taiwan, can’t it infect someone in Madagascar? (Something like that.)

Where did this number come from… (ominous ellipses)

Back in 1942, someone took a “high-speed camera” and photographed respiratory droplets to see if they could travel six feet. They found that most of the droplets fell within 3 feet, which became the party line for social distancing for decades. That’s right – we based social distancing on images from a 1940s camera that photographed spittle drops. 3 feet.

To try and further suss it out, a few bold (?crazy) scientists in the UK opened up the Common Cold Research Unit in 1946. They offered volunteers a 10-day getaway in Salisbury, UK, under one condition… volunteers agreed to be inoculated with the common cold. They suggested in 1947 that the safest distance was 30 feet, though the podcast referenced later here suggests 3ft for large droplets (again). Check out this original publication:

https://journals.sagepub.com/doi/pdf/10.1177/003591574704001104

And a video of their unit from the 50s: https://www.youtube.com/watch?v=SJfBU_MUpI0&feature=emb_logo

In the 1980s through the 2000s, more data (from studies and other outbreaks) came out to suggest not one, but two meters would likely be more effective. So that's where we've stayed...

Fast forward to this year, a systematic review that respiratory droplets often went farther than two meters – like, much farther. Like, 8 meters.

Not only that, but some suggest COVID stays in the air for 16hours! (Though the prevalence and infectivity of these particles is debatable.)

Lots of factors can increase the distance of droplet/particle transmission and it seems that 6 feet may be a bit of an outdated blanket statement. Consider maintaining as much distance as reasonably attainable in your various social situations. Wash your hands, wear a mask, and wear eye protection.

For all you auditory learners, check out this 20min podcast by Radiolab: https://www.wnycstudios.org/podcasts/radiolab/articles/dispatch-4-six-feet

For all you visual learners, below are some fascinating shots of simulated “violent respiratory events” with and without masks, from AIP Physics of Fluids.

(For all you kinesthetic learners, just wear a mask.) 

References:

WHO: who.int/emergencies/diseases/novel-coronavirus-2019/advice-for-publi

CEBM: https://www.cebm.net/covid-19/what-is-the-evidence-to-support-the-2-metre-social-distancing-rule-to-reduce-covid-19-transmission/

Visualizing the Effectiveness of Face Masks in Obstructing Respiratoory Jets: https://aip.scitation.org/doi/10.1063/5.0016018

Radiolab: https://www.wnycstudios.org/podcasts/radiolab/articles/dispatch-4-six-feet

Other references embedded in the the above email

Screen Shot 2020-10-21 at 12.57.31 PM.png

How to Hook up Multiple Patients to the Same Vent

Today, we’re going to talk about hooking up multiple intubated patients to the same ventilator.  As the coronavirus becomes increasingly more prevalent and more patients require intubation, knowing how to do this may become more important than ever before.


  • Why would I do this?

    • As more and more patients require intubation, ventilators are going to become a precious resource.  We want to maximize our resources to help as many people as possible.

    • So what are the downsides?

    • You can no longer adjust the vent to optimize it for a single patient

      • Under normal circumstances, you want to optimize vent settings for a specific patient

      • This allows you to maximize oxygenation and ventilation while also keeping the patient as comfortable as possible on the ventilator in order to avoid having to over-sedate the patient

    • You can no longer allow a patient to trigger the vent

      • Under normal circumstances, vents allow a patient to trigger a breath

        • This is helpful because it is more comfortable for the patient and will allow an intubated patient to be less sedated

      • However, you don’t want one patient triggering breaths on the vent and thereby affecting every other patient

        • For example, if one patient is tachypneic and triggering breaths, all other patients attached to the same vent will be forced to breathe at this rate as well

    • Ventilation is less effective

      • In order to attach multiple patients to a single vent, you will need to use a large amount of tubing with Y-site connectors

      • This results in increased dead space making tidal volumes less accurate

      • As a result, patients are more likely to develop hypercapnia in this setup

        • This will likely require permissive hypercapnia in these patients

  • Now that we understand the downsides to this setup, let’s discuss the settings you will need to consider

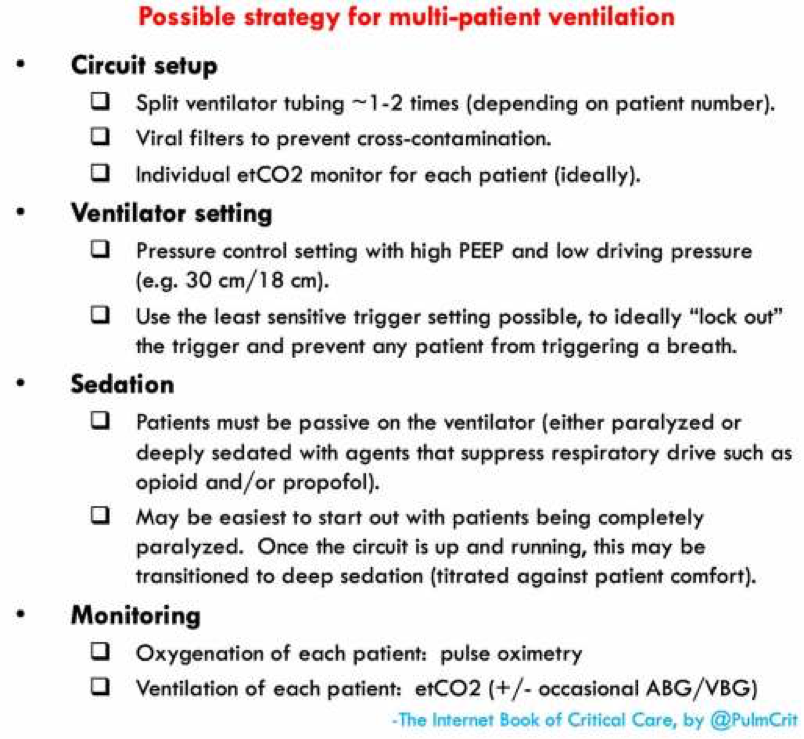
    • You will want to use pressure control for these patients

      • Why not volume control?

        • Normally, volume control is helpful because it allows you to provide a specific tidal volume to a patient, but is limited because it allows no control over peak pressure

        • When you have multiple patients attached to a single vent, however, you are no longer able to accurately control the tidal volume of any single patient

        • If there is a problem with one patient, for example if there is an obstruction or kinking of the ET tube, than the other patient on the vent will get significantly increased tidal volume as the volume intended for 2 patients enters only 1.  This can result in dangerously high peak pressures and barotrauma.

        • If you want to hook up multiple patients to the same vent with volume control, they would all need to receive the same volume, meaning they should all be a similar size.  This further restricts which patients may be placed on the same vent.

      • Why is pressure control better?

        • Even with multiple patients hooked up to the same vent, you can maintain adequate control over the peak pressures supplied.

        • If there is a problem with one patient, for example there is an obstruction or kinking of one ET tube, it will not affect the other patient.  The patient with the problematic ET tube will receive less tidal volume, but the other patient on the vent will be unaffected.

        • Different sized patients can be hooked up to the same vent, since larger patients have higher compliance and therefore will receive larger breaths

    • You should set the vent to continuous mandatory ventilation

      • You do not want patients to trigger the vent and thereby affect other patients attached

      • Instead, you need continuous mandatory ventilation, in which the vent is set to a fixed rate and the patient cannot trigger the vent

      • If the vent does not have this mode as an option, you can instead max out the ventilator trigger threshold, thereby preventing patients from triggering the vent

        • If this doesn’t work or the patient is fighting the vent, then you may need to consider sedation that also suppresses the respiratory drive such as opiates and propofol

        • If even that is unsuccessful and the patient is still fighting or triggering the vent, you may need to consider paralytics

  • Ok, now we understand the pros and cons, as well as the settings we need. How do we set this up?

    • First, make sure the patients you are attaching to a single ventilator have similar vent requirements; ie don’t attach a patient who needs an FiO2 of 30% and PEEP of 5 to the same machine as a patient who needs an FiO2 of 100% and PEEP of 15

    • Set up the vent settings as discussed above

    • Attach viral filters to prevent cross-contamination between patients

    • Using Y-site connectors, attach the expiratory and inspiratory limbs of the vent to all ET tubes as shown in the diagram

  • Keep in mind, that this setup has been tested primarily with lung models and animals; there isn’t significant data from human studies.  But it may be important despite this going forward!

Pics courtesy of emcrit.org 

Stay safe everyone!

Vent splitting pic 2.png
vent splitting pic 1.png

Testing Process for COVID-19

COVID-19 testing


Hi everyone,


The process for testing for COVID-19 keeps changing and has become pretty confusing.  So we’re going to go through it all in detail!  If you have any questions about what needs to be done, you can also always call the lab at 718-283-8231 for more information.


  1. Call the DoH for approval to test for COVID-19

    • Their number is 866-692-3641

      • This number can also be found via the globe by scrolling to the bottom of the screen under the Phone Numbers section, or in the lab order screen after selecting COVID-19 Screening.

    • Be aware, they are currently only approving testing for patients being admitted to the hospital.  If you feel strongly that a patient who is being discharged should be tested, you will need to send the samples up to the lab which will store the samples until commercial testing becomes available.  This doesn’t mean don’t call the DoH, but just be prepared that they will probably deny the test for discharged patients.

  2. If they approve the testing, they will take down your information and provide you with a subject number.  You need this subject number in order for the lab to process the test and send it out to the DoH for testing.  You should ask them for the subject number over the phone, otherwise you may be waiting a long time for an email with that information.

  3. If they do not approve the testing but you feel that this patient should be tested, for example they are being discharged but you consider them high risk, then you will not be given a subject number by the DoH.  Simply place the order through HMED and the lab should hold onto the samples until a commercial testing site is available to run them.

  4. Whether the DoH approved the testing or not, order the COVID-19 testing through HMED.  It can be found under Common labs à COVID-19 Screening.

  5. Complete the COVID-19 Lab Submission Request

    • To do this, click on the globe and select “Taylor Healthcare (Standard Register)” under the Patient Specific Links section.

    • Once on Taylor Healthcare, search for “covid” or “10087” (the document number) to find the form

    • Print out the selected form and complete any sections marked with an *

  6. Collect the specimens.  This requires 1 nasopharyngeal swab and 1 oropharyngeal swab.

    • You should use the flu swabs, which are the same as the RVP swabs, for both samples.  These can be found with the charge nurse.    

    • For the nasopharyngeal swab, insert the swab in 1 nostril parallel to the palate.  Leave the swab there for a few seconds to absorb secretions, then remove.  Repeat this process in the other nostril using the same swab.

    • For the oropharyngeal swab, insert a new swab into the posterior oropharynx, avoiding the tongue.  This is similar to a strep swab.

    • Each swab should be in its own medium, do not combine them.  In other words, you should have 1 tube with 1 nasopharyngeal swab, and a 2nd tube with 1 oropharyngeal swab.

  7. Label the specimens with the following information:

    • Patient’s first and last names

    • Patient date of birth

    • Date and time of collection

    • Specimen source

  8. Make sure the subject number provided by the DoH (if they approved the test) is associated with these samples, either on the label itself or on the biohazard bag, as well as in a progress note in the chart

  9. Transport the specimen to the lab for testing.

    • All specimens must be transported by hand to the lab.

    • All specimens should be in a biohazard bag and transported in a Styrofoam container.

      •      You can get a Styrofoam container from the charge nurse.

    • Wear gloves while transporting the specimens!