Today, we’re going to talk about hooking up multiple intubated patients to the same ventilator. As the coronavirus becomes increasingly more prevalent and more patients require intubation, knowing how to do this may become more important than ever before.
Why would I do this?
As more and more patients require intubation, ventilators are going to become a precious resource. We want to maximize our resources to help as many people as possible.
So what are the downsides?
You can no longer adjust the vent to optimize it for a single patient
Under normal circumstances, you want to optimize vent settings for a specific patient
This allows you to maximize oxygenation and ventilation while also keeping the patient as comfortable as possible on the ventilator in order to avoid having to over-sedate the patient
You can no longer allow a patient to trigger the vent
Under normal circumstances, vents allow a patient to trigger a breath
This is helpful because it is more comfortable for the patient and will allow an intubated patient to be less sedated
However, you don’t want one patient triggering breaths on the vent and thereby affecting every other patient
For example, if one patient is tachypneic and triggering breaths, all other patients attached to the same vent will be forced to breathe at this rate as well
Ventilation is less effective
In order to attach multiple patients to a single vent, you will need to use a large amount of tubing with Y-site connectors
This results in increased dead space making tidal volumes less accurate
As a result, patients are more likely to develop hypercapnia in this setup
This will likely require permissive hypercapnia in these patients
Now that we understand the downsides to this setup, let’s discuss the settings you will need to consider
You will want to use pressure control for these patients
Why not volume control?
Normally, volume control is helpful because it allows you to provide a specific tidal volume to a patient, but is limited because it allows no control over peak pressure
When you have multiple patients attached to a single vent, however, you are no longer able to accurately control the tidal volume of any single patient
If there is a problem with one patient, for example if there is an obstruction or kinking of the ET tube, than the other patient on the vent will get significantly increased tidal volume as the volume intended for 2 patients enters only 1. This can result in dangerously high peak pressures and barotrauma.
If you want to hook up multiple patients to the same vent with volume control, they would all need to receive the same volume, meaning they should all be a similar size. This further restricts which patients may be placed on the same vent.
Why is pressure control better?
Even with multiple patients hooked up to the same vent, you can maintain adequate control over the peak pressures supplied.
If there is a problem with one patient, for example there is an obstruction or kinking of one ET tube, it will not affect the other patient. The patient with the problematic ET tube will receive less tidal volume, but the other patient on the vent will be unaffected.
Different sized patients can be hooked up to the same vent, since larger patients have higher compliance and therefore will receive larger breaths
You should set the vent to continuous mandatory ventilation
You do not want patients to trigger the vent and thereby affect other patients attached
Instead, you need continuous mandatory ventilation, in which the vent is set to a fixed rate and the patient cannot trigger the vent
If the vent does not have this mode as an option, you can instead max out the ventilator trigger threshold, thereby preventing patients from triggering the vent
If this doesn’t work or the patient is fighting the vent, then you may need to consider sedation that also suppresses the respiratory drive such as opiates and propofol
If even that is unsuccessful and the patient is still fighting or triggering the vent, you may need to consider paralytics
Ok, now we understand the pros and cons, as well as the settings we need. How do we set this up?
First, make sure the patients you are attaching to a single ventilator have similar vent requirements; ie don’t attach a patient who needs an FiO2 of 30% and PEEP of 5 to the same machine as a patient who needs an FiO2 of 100% and PEEP of 15
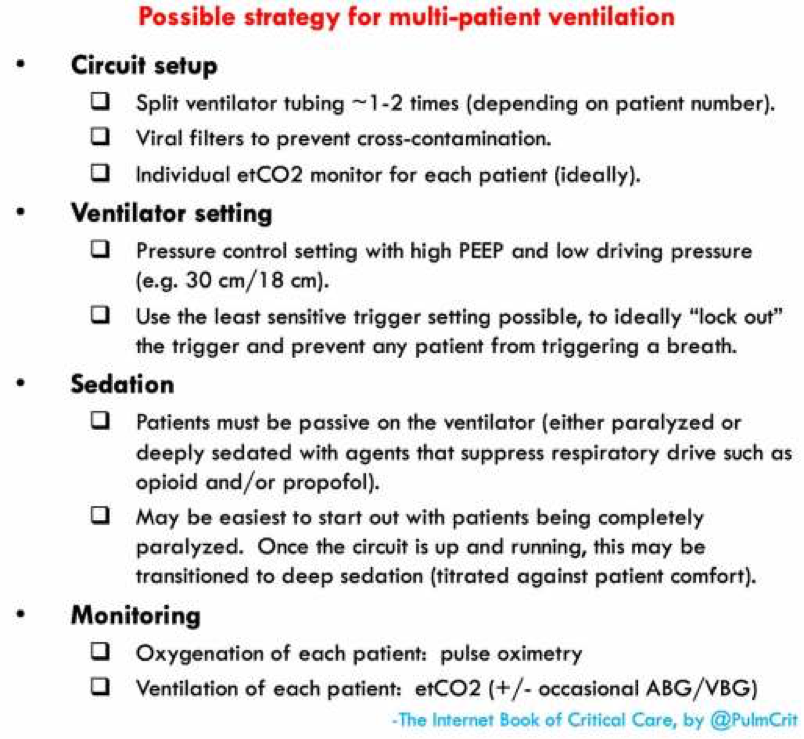
Set up the vent settings as discussed above
Attach viral filters to prevent cross-contamination between patients
Using Y-site connectors, attach the expiratory and inspiratory limbs of the vent to all ET tubes as shown in the diagram
Keep in mind, that this setup has been tested primarily with lung models and animals; there isn’t significant data from human studies. But it may be important despite this going forward!
Pics courtesy of emcrit.org
Stay safe everyone!